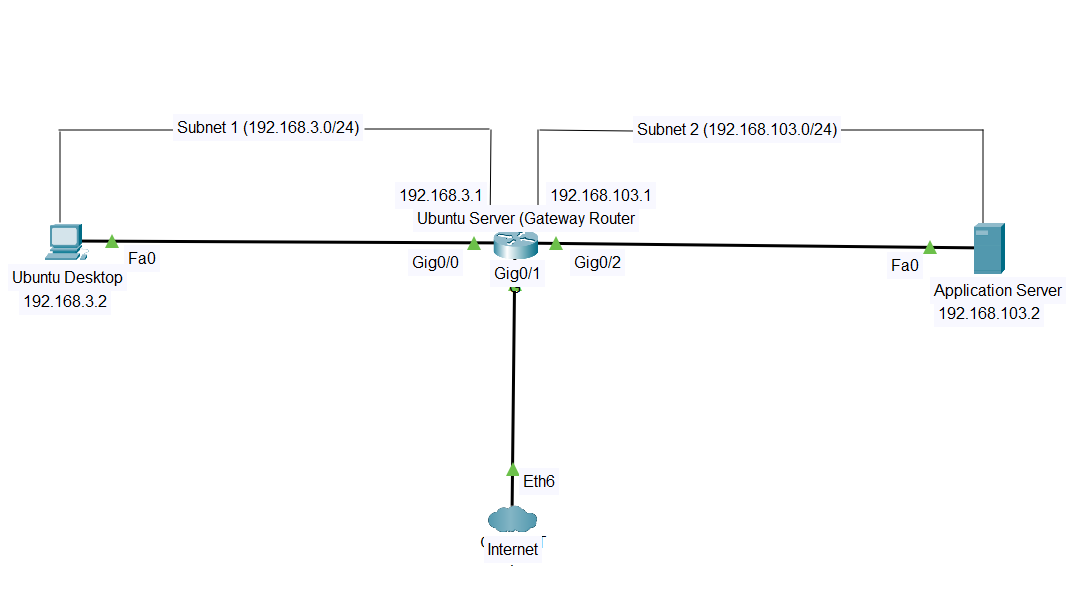
WHAT IS A SANDBOX NETWORK
According to VMWare, A network sandbox is an isolated testing environment that enables security teams to observe, analyze, detect, and block suspicious artifacts traversing the network. Read More
USE OF SANDBOX NETWORK
- Configuration testing
- Cybersecurity scenario simulation such as routing, subnetting, or network troubleshooting.
- Understanding network protocols.
- Educational purposes.
KEY FEATURES OF THIS SANDBOX NETWORK
- An Ubuntu desktop connected to a gateway server interface (enp0s3).
- A Bitnami WordPress server connected to another interface of the gateway (enp0s8).
- An Interface of the gateway configure for internet access using the Ubuntu Desktop (enp0s9).
- An active communication between the Ubuntu desktop which is on one subnet and the Ubuntu WordPress server on another subnet.
- Access to the internet from the Ubuntu Desktop.
REQUIREMENT
- An Ubuntu Desktop VM
- A Gateway Router (Here we are using an Ubuntu Server)
- An Application Server (Here we are using a Bitnami WordPress server)
IMPORTANT NOTICE: All IP addresses used in this demonstration are for educational purposes only.
PROCESS
- Download and Install an Ubuntu Destop VM
- Download and Install an Ubuntu Server VM
- Download and Install a Bitnami WordPress Server VM
- Download Bitnami Wordpress Server OVA file Here
- SETTING UP BITNAMI WORDPRESS SERVER
 Launch VirtualBox and click **FILE**
 Click **Import Appliances**
 Select the downloaded ova file
 Click finish.
 Launch the virtual machine
- SETTING UP BITNAMI WORDPRESS SERVER
- Download Bitnami Wordpress Server OVA file Here
-
Configure your Ubuntu Server gateway router with three network interfaces
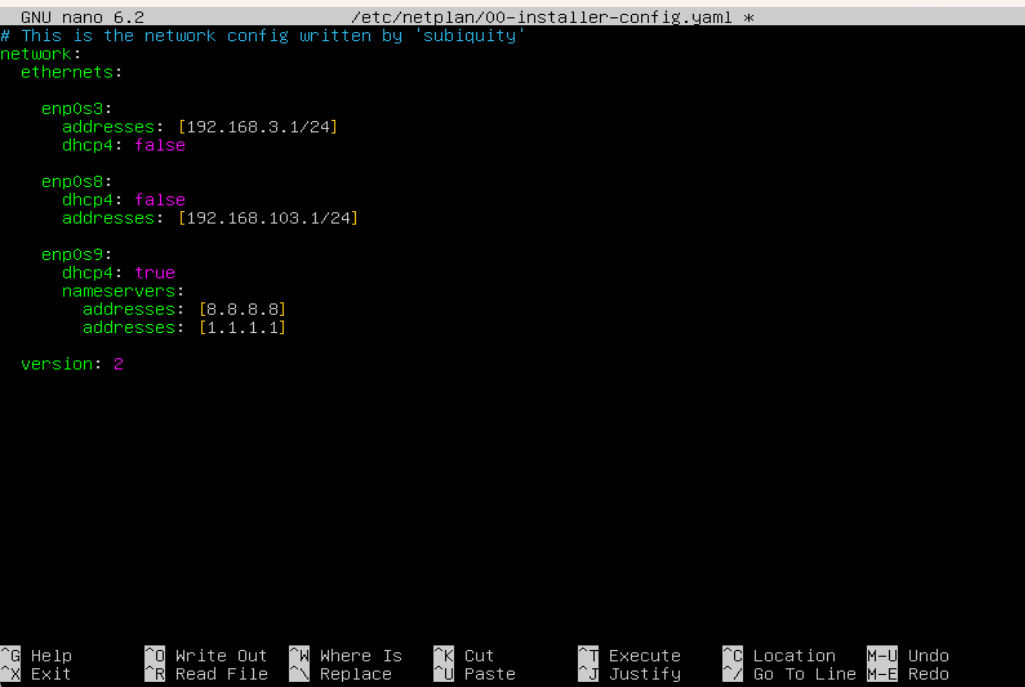
SUBNETS USED
 Subnet one: 192.168.3.0/24 Interface IP address is 192.168.3.1 This belongs to the internal network ***intnet***
 Subnet two:192.168.103.0/24 Interface IP address is 192.168.103.1 This belongs to the internal network ***intnet1***
 Domain name servers: 8.8.8.8 and 1.1.1.1
IMPORTANT: Always name your internal networks properly for easy identification.
-
Configure your Ubuntu Desktop VM to run an internal network.
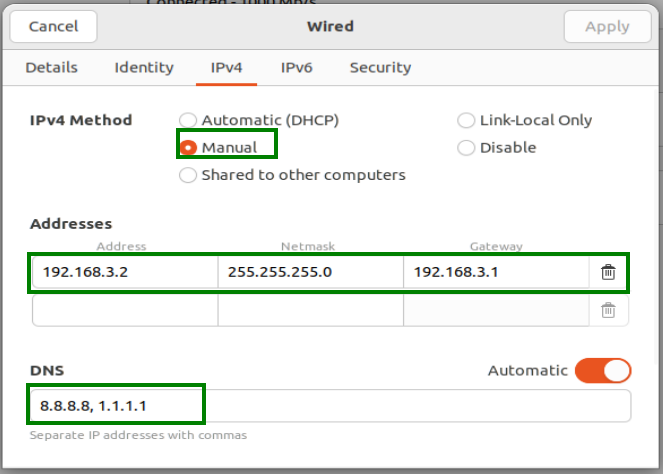
SUBNET USED
- 192.168.3.0/24 IP address of the Ubuntu Desktop VM is 192.168.3.2 This implies the Ubuntu Desktop will be connected to the network interface enp0s3 of the gateway router with the IP address 192.168.3.1
-
Except you name your internal network differently, ensure you select intnet as the internal network on your Ubuntu Desktop because it’s the name of the internal network on the Ubuntu server gateway we are connecting.
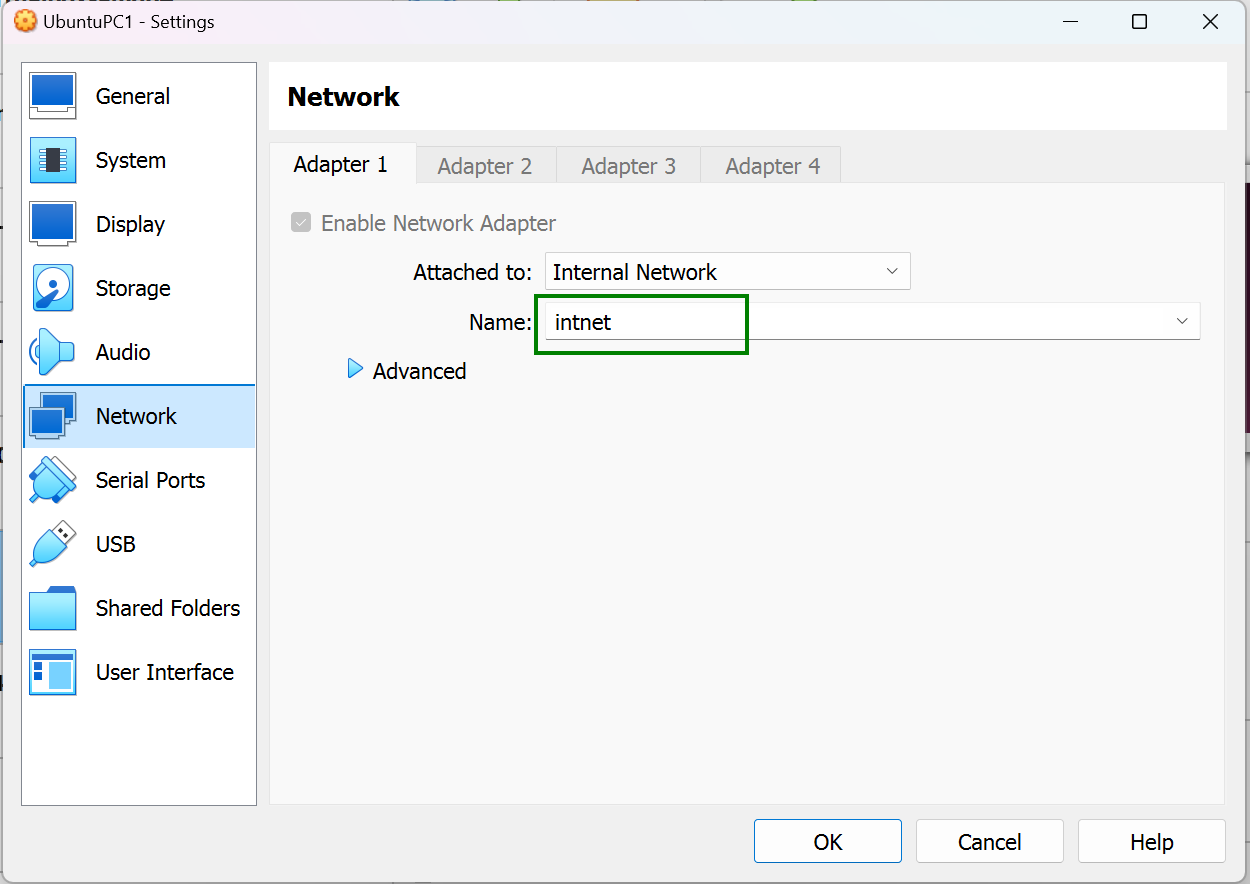
IMPORTANT The gateway address on the Ubuntu Desktop must be the address of the gateway router interface enp0s3 (192.168.3.1) else it won’t connect.
-
Configure your Bitnami WordPress(Application server)
-
Detect your network interface name using the command
ip a
-
Enter the command
sudo nano /etc/systemd/network/25-wired.networkto configure the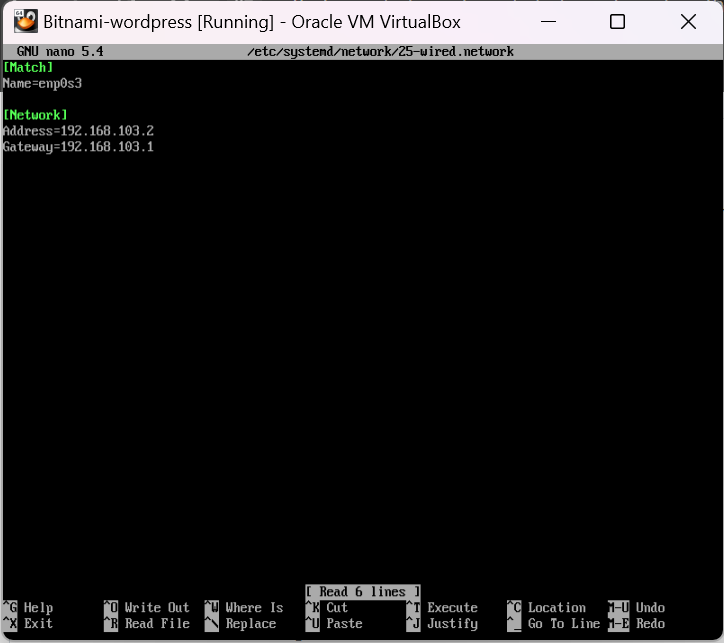
-
Enter the command
sudo systemctl restart systemd-networkd.serviceto restart the network.
SUBNET USED
- 192.168.103.0/24 The IP address of the Bitnami WordPress server is 192.168.103.2 This implies the Bitnami WordPress server will be connected to the network interface enp0s8 of the gateway router with the IP address 192.168.103.1
-
Except you name your internal network differently, ensure you select intnet1 as the internal network on your Bitnami WordPress because it’s the name of the internal network on the Ubuntu server gateway we are connecting.

-
-
Enable IP forwarding on your Ubuntu server gateway router.
- Enter the command
sudo nano /etc/sysctl.conf -
Uncomment the
net.ipv4.ip_forward=1as shown below.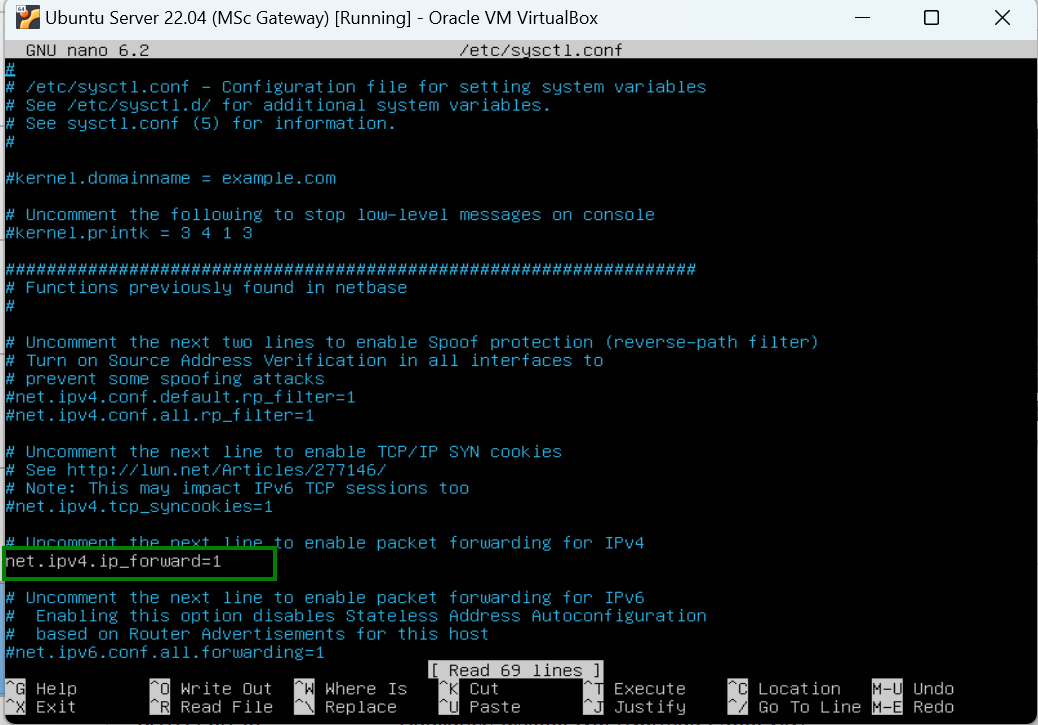
- Exit the terminal with ctrl x
-
Type y when prompted then hit enter button to continue.
PURPOSE To enable routing between the two different subnets
- Enter the command
- Create a routing table
- Enter the following commands to create a routing table on the Ubuntu Server (gateway router)
sudo iptables -A FORWARD -i enp0s3 -o enp0s8 -j ACCEPT
sudo iptables -A FORWARD -i enp0s8 -o enp0s3 -j ACCEPT
PURPOSE Allow forwarding between enp0s3 and enp0s8
sudo iptables -A FORWARD -i enp0s9 -o enp0s3 -j ACCEPT
sudo iptables -A FORWARD -i enp0s3 -o enp0s9 -j ACCEPT
sudo iptables -A FORWARD -i enp0s9 -o enp0s8 -j ACCEPT
sudo iptables -A FORWARD -i enp0s8 -o enp0s9 -j ACCEPT
PURPOSE Allow forwarding between enp0s9 and the internal interfaces
sudo iptables -t nat -A POSTROUTING -o enp0s9 -j MASQUERADEPURPOSE Enable NAT on enp0s9 for internet access
- Enter the following commands to create a routing table on the Ubuntu Server (gateway router)
- Test Connectivity
- On the Ubuntu Desktop VM try pinging
  192.168.3.1 using "ping 192.168.3.1"
  192.168.103.1 using "ping 192.168.103.1"
  192.168.103.2 using "ping 192.168.103.2"
  8.8.8.8 using "ping 8.8.8.8"
- On the Bitnami WordPress VM server try pinging
192.168.103.1 using "ping 192.168.103.1" 192.168.3.1 "using ping 192.168.3.1" 192.168.3.2 "using ping 192.168.3.2"- On the Ubuntu Desktop Vm try browsing the internet using the web browser.
COMMON MISTAKES
- communicating with the wrong internal network.
SOLUTION
- Ensure you are not using same name for two internal networks on your Ubuntu server gateway router.
- Select the right internal network for the each vm connecting with the Ubuntu server gateway router. For example the ubuntu desktop here is connecting with the network interface enp0s3 which has the name intnet. If I select intnet1 as the internal network on the Ubuntu Desktop, it won’t work.
 SETTING UP AN UBUNTU DESKTOP VM