
WAZUH SERVER INSTALLATION
The server is used for the analysis of received data from wazuh agents, triggering alerts when threats or anomalies are detected.
STEP ONE: Server Node Installation
- Add the Wazuh Repository
echo "deb [signed-by=/usr/share/keyrings/wazuh.gpg] https://packages.wazuh.com/4.x/apt stable main" | tee -a /etc/apt/sources.list.d/wazuh.list
- Update the Packages
sudo apt-get update
STEP TWO: Wazuh Manager Installation
sudo apt-get -y install wazuh-manager
STEP THREE: Filebeat Installation
sudo apt-get -y install filebeat
STEP FOUR: Configure Filebeat
- Download the preconfigured Filebeat configuration file.
curl -so /etc/filebeat/filebeat.yml https://packages.wazuh.com/4.12/tpl/wazuh/filebeat/filebeat.yml
- Configure the filebeat.yml
Edit the filebeat configuration
sudo nano /etc/filebeat/filebeat.yml
Change the host to the host of the indexer. In this case, my host is 192.168.3.1

- Create a Filebeat keystore for secure authentication credentials
sudo filebeat keystore create
- Add the dafault username and password admin:admin to the secrets keystore.
echo admin | filebeat keystore add username --stdin --force
echo admin | filebeat keystore add password --stdin --force
- Download the alerts template for the Wazuh indexer
curl -so /etc/filebeat/wazuh-template.json https://raw.githubusercontent.com/wazuh/wazuh/v4.12.0/extensions/elasticsearch/7.x/wazuh-template.json
chmod go+r /etc/filebeat/wazuh-template.json
- Wazuh Module for Filebeat Installation
curl -s https://packages.wazuh.com/4.x/filebeat/wazuh-filebeat-0.4.tar.gz | tar -xvz -C /usr/share/filebeat/module
STEP FIVE: Certificate Deployment
NODE_NAME=<SERVER_NODE_NAME>
- Create a directory named certs in the filebeat directory
mkdir /etc/filebeat/certs
- Compress and move the content of wazuh-certificates into the created directory.
tar -xf ./wazuh-certificates.tar -C /etc/filebeat/certs/ ./$NODE_NAME.pem ./$NODE_NAME-key.pem ./admin.pem ./admin-key.pem ./root-ca.pem
Important: Don’t forget to change $NODE_NAME to your node name. In my case it will be
tar -xf ./wazuh-certificates.tar -C /etc/filebeat/certs/ ./node-1.pem ./node-1-key.pem ./admin.pem ./admin-key.pem ./root-ca.pem
- Rename $NODE_NAME.pem and $NODE_NAME-key.pem to filebeat.pem and filebeat-key.pem
mv -n /etc/wazuh-indexer/certs/$NODE_NAME.pem /etc/filebeat/certs/filebeat.pem
mv -n /etc/wazuh-indexer/certs/$NODE_NAME-key.pem /etc/filebeat/certs/filebeat-key.pem
- Change permission and ownership
chmod 500 /etc/filebeat/certs
chmod 400 /etc/filebeat/certs/*
chown -R root:root /etc/filebeat/certs
STEP SIX: Configure the Wazuh Indexer Connection
echo '<INDEXER_USERNAME>' | /var/ossec/bin/wazuh-keystore -f indexer -k username
echo '<INDEXER_PASSWORD>' | /var/ossec/bin/wazuh-keystore -f indexer -k password
NOTE: We are using the default credentials So, the command will now be
echo 'admin' | /var/ossec/bin/wazuh-keystore -f indexer -k username
echo 'admin' | /var/ossec/bin/wazuh-keystore -f indexer -k password
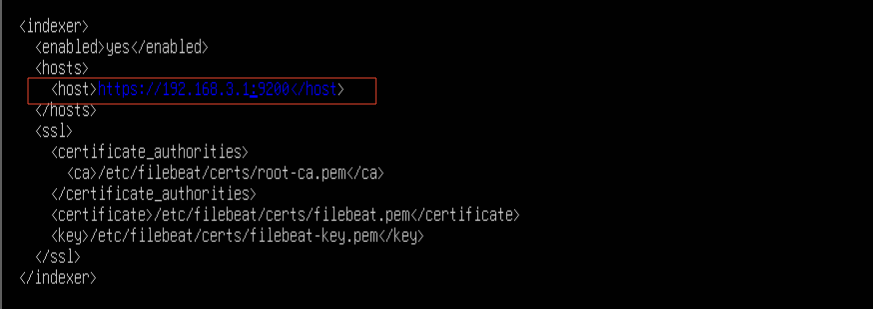
- Add the Indexer Node IP Address to the ossec.conf file
Edit the ossec.conf file
sudo nano /var/ossec/etc/ossec.conf
STEP SEVEN: Start the Wazuh Manager
sudo systemctl daemon-reload
sudo systemctl enable wazuh-manager
sudo systemctl start wazuh-manager
STEP EIGHT: Verify the Wazuh Manager status
systemctl status wazuh-manager
STEP NINE: Start the Filebeat Service
- Enable and start the Filebeat service.
sudo systemctl daemon-reload
sudo systemctl enable filebeat
sudo systemctl start filebeat
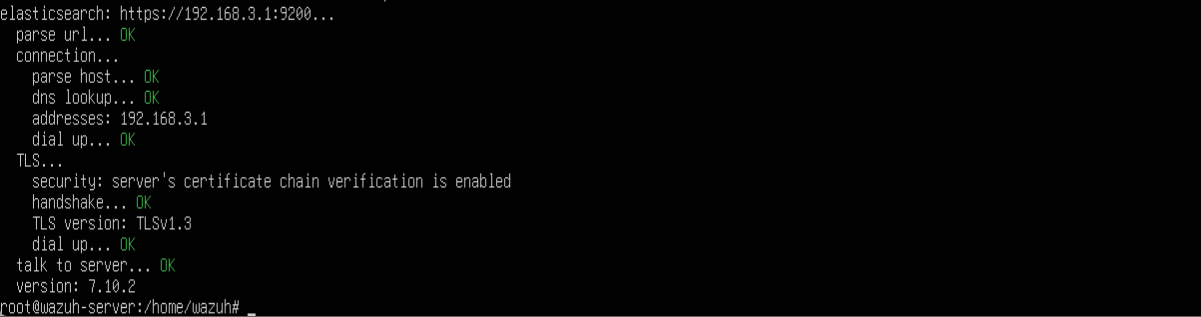
STEP TEN: Verify Filebeat Successful Installation
filebeat test output
STEP ELEVEN: Disable Wazuh Update
sudo sed -i "s/^deb /#deb /" /etc/apt/sources.list.d/wazuh.list
sudo apt update
Server is active on port 9200 ENJOY !!!
